Unit testing a C++ console app with the Native test framework in Visual Studio
June 2020 (1591 Words, 9 Minutes)
In this post, I’ll show you how to set up and run unit tests for a native C++ console app using Visual Studio 2019’s built-in testing tools. I’ll cover setting up the test project, writing tests, and running them in Terminal. We’ll also look at some pitfalls I encountered along the way.
Table of Contents
- Table of Contents
- Welcome to TheGame
- Setting up Unit Tests in Visual Studio 2019
- Writing the Unit Tests
- Running the Tests
- Stuff That Didn’t Go to Plan
- What’s Next?
Welcome to TheGame
To learn C++, I’m building the well known game Tic Tac Toe using Visual Studio 2019, while reading through Stroustrup’s “The C++ Programming Language (4th Edition)”. I’m no designer, so it’s a console app that runs in Terminal.
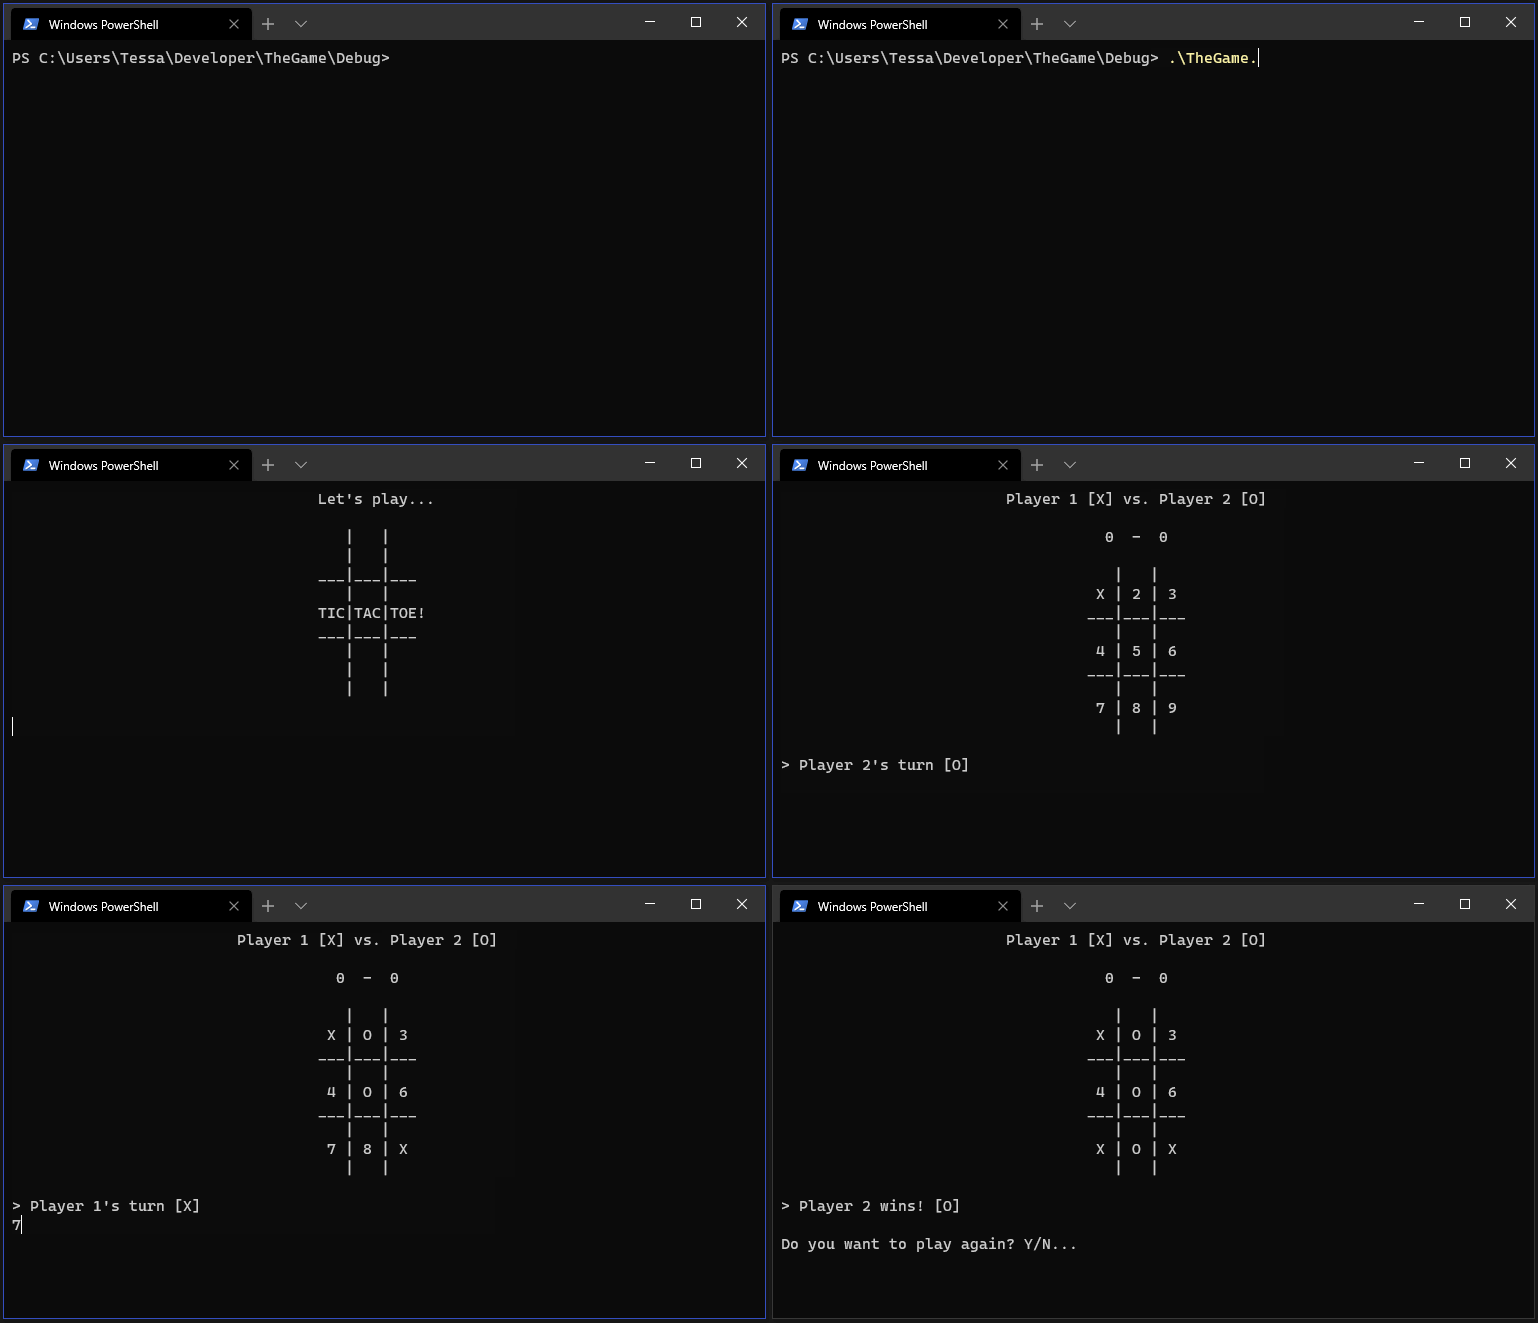
The entire game (literally everything) is located in a single .cpp file in my VS solution called TheGame.cpp. I know—my creativity knows no bounds. But it’s rather ugly, so I’m going to refactor the program to be object-oriented. Before making any changes, I wrote unit tests to make sure I won’t break anything while refactoring.
Since TheGame.cpp is a console app, it seemed fitting to use Terminal to run the tests. For this, I used Visual Studio’s unit testing tools VSTest.console.exe and the Native C++ unit test framework.
Setting up Unit Tests in Visual Studio 2019
VS 2019 ships with a native C++ Unit Test Framework, which defines a series of macros for simplified syntax. Setting up the unit tests was nice and simple—I created a separate Native Unit Test Project in my solution:
- Right-click the solution and click
Add > New > Project. - Under the
Project Typefilter, chooseTest. -
Select
Native Unit Test Project, give the project a descriptive name, and clickOK.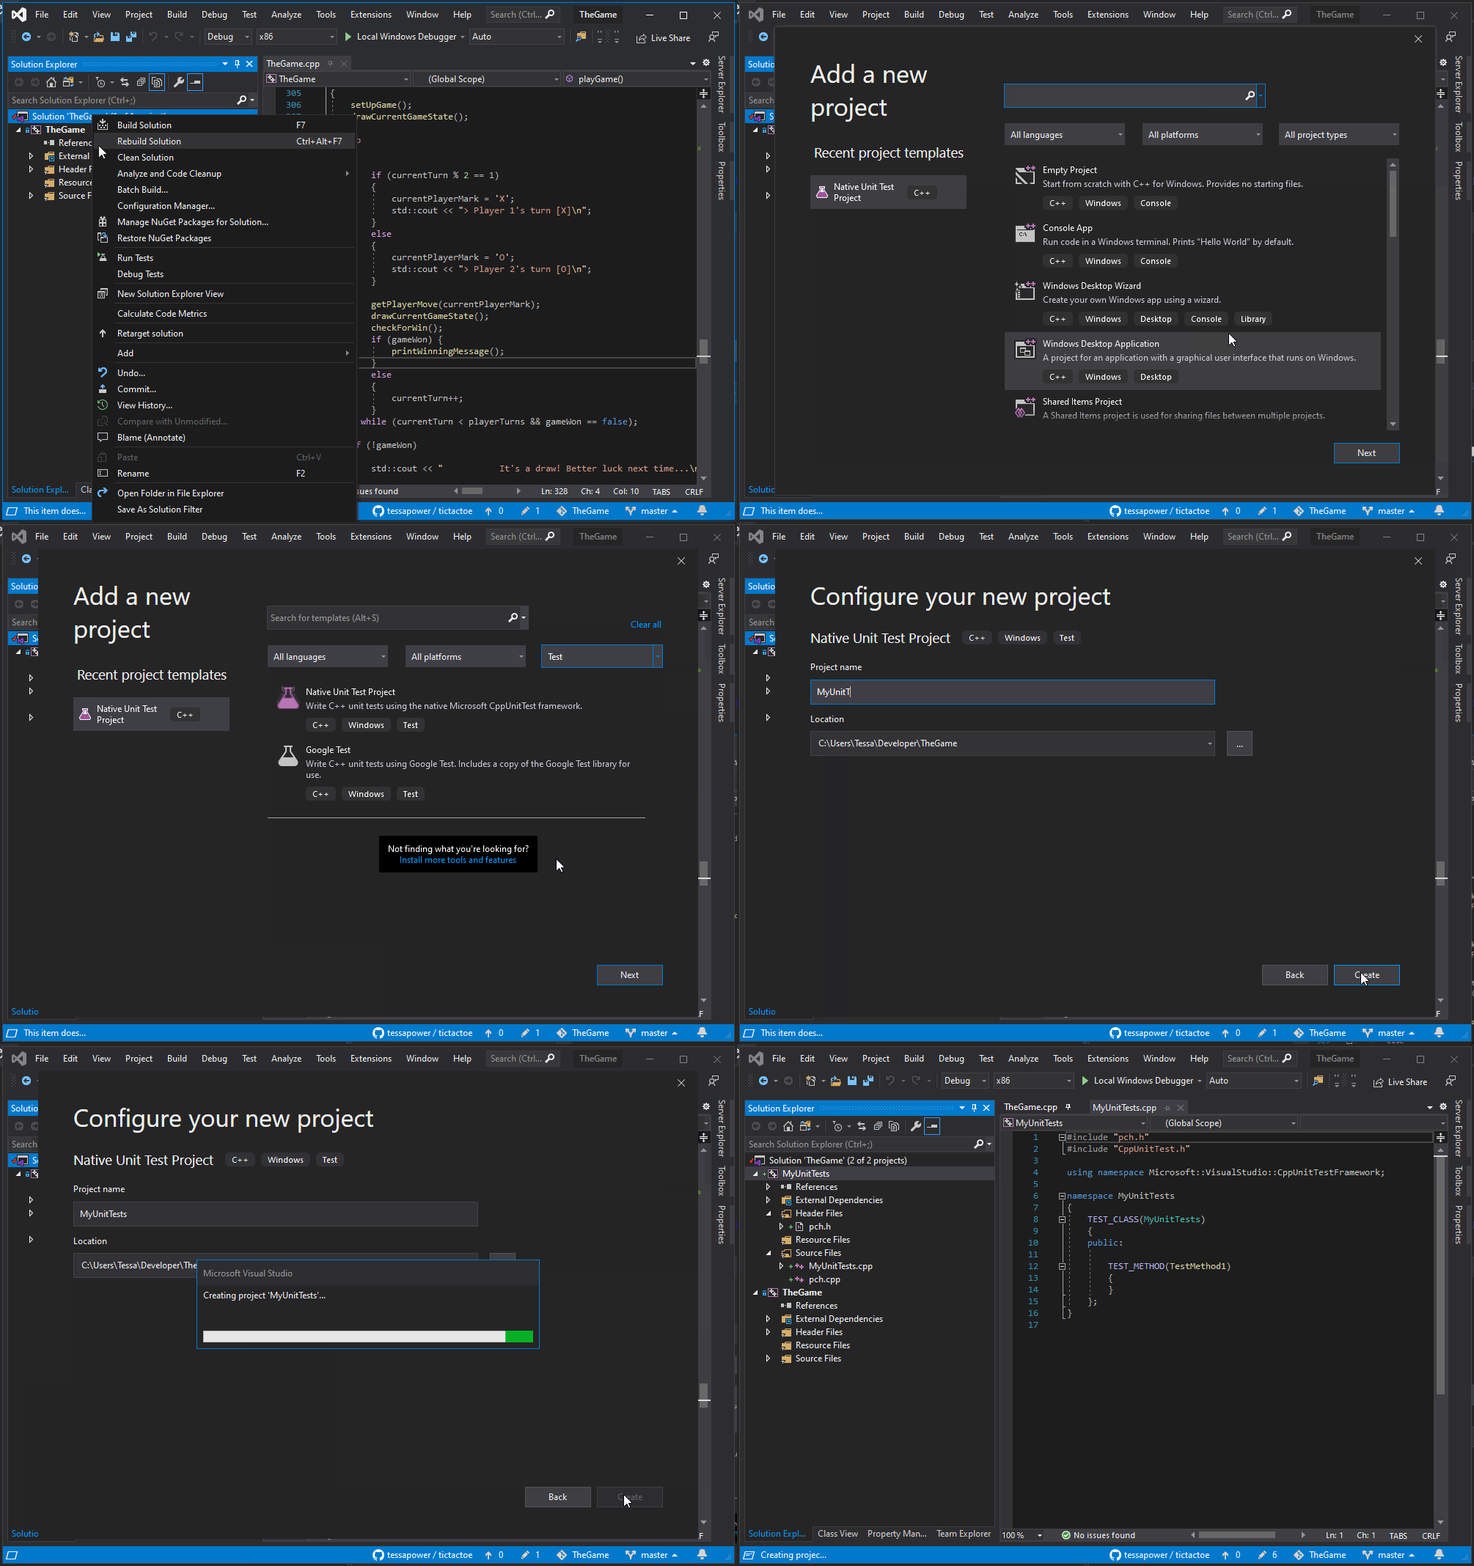
When creating a separate test project in VS 2019, you need to create a reference to the project you want to test. This gives the Unit Test Project access to the project you want to test.
- Right-click the Unit Test Project and click
Add > Reference... -
Check the box next to the projects to test and click
OK.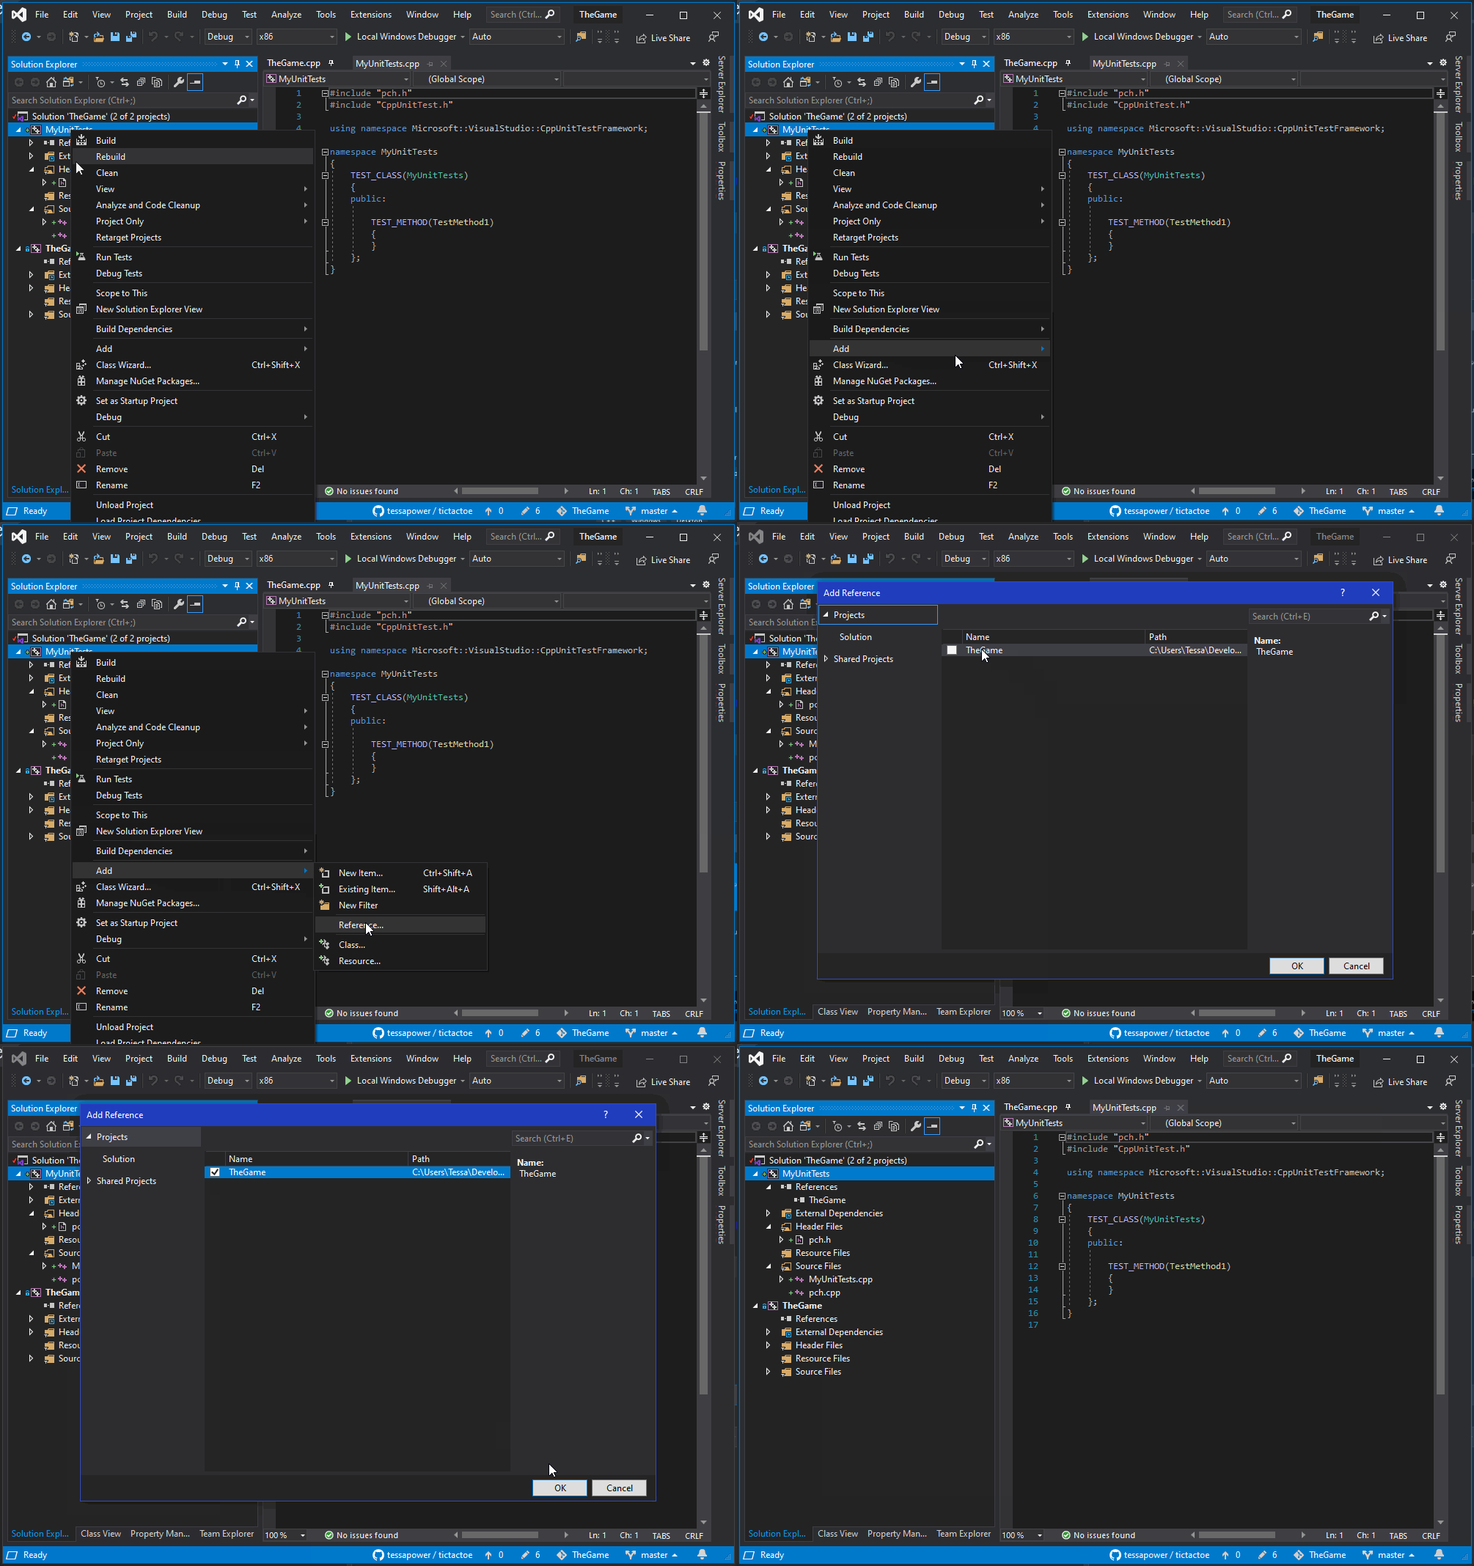
#include the header files the unit tests need access to. The reference doesn’t automatically give the Unit Test Project access to the #included headers from the referenced project—you need to specify the ones it will need. At this stage, I didn’t have any header files, so I didn’t realise until later.Deciding How to Structure the Unit Test Project
When you create a Unit Test Project as described above, VS creates a template project, a .cpp file with example unit tests classes, unit test methods, and all the Native test framework dependencies already in place! It gave me a nice headstart and was easy to pickup how I should structure my tests. I decided to use this .cpp file to test only the game logic and to add .cpp files for other areas later.
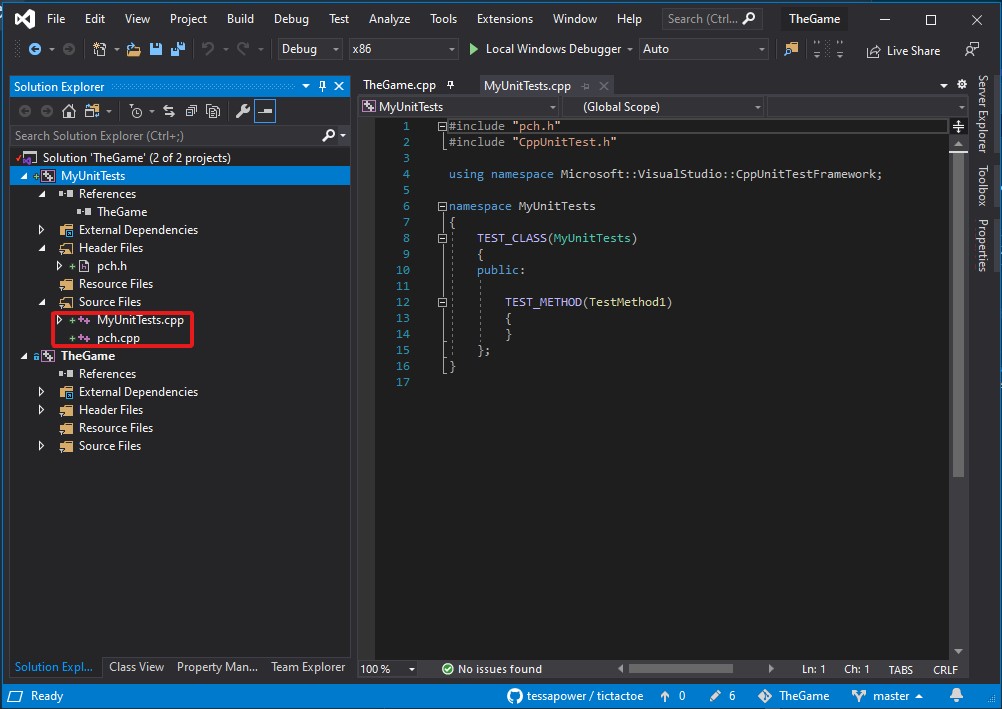
Splitting up unit testing over multiple .cpp files allows me to run one, some, or all of my unit tests. I could also do this by creating playlists of unit tests. So if I am working in area X, I don’t need to also run the unit tests for area Y, which will speed up development. In my case it’d probably only be a few seconds, but still useful.
Writing the Unit Tests
My first goal is to refactor how TheGame.cpp checks for a winner, so I wrote tests for what would later be my GameWinChecker class. This meant also thinking about how GameWinChecker should work. The rules of Tic Tac Toe are simple and well defined—I only needed to translate them into C++.
Knowing What to Test
In TheGame.cpp, the state of the gameboard, a.k.a. the gameState, is an empty STL array. As players make moves, the gameState fills up with their symbols. Each index corresponds to a position on the 3x3 board.
   |   |
 0 | 1 | 2   // Horizontal winning combos:
___|___|___  // 0, 1, 2  or  3, 4, 5  or  6, 7, 8
   |   |
 3 | 4 | 5   // Vertical winning combos:
___|___|___  // 0, 3, 6  or  1, 4, 7  or  2, 5, 8
   |   |
 6 | 7 | 8   // Diagonal winning combos:
   |   |     // 0, 4, 8  or 2, 4, 6
In this case, it makes sense to check if a certain player’s symbol (the X or O) has a winning combo in the gameState and return a bool.
The checkIfSymbolHasWon function takes a player symbol and the game state, and returns true if the symbol has won:
const bool checkIfSymbolHasWon(char symbol, std::array<char, 9> gameState);
Having now defined the function, I could start writing the tests for it.
Covering the Test Cases
The first test cases covered the basic assumptions, e.g if gameState is full but has no winning move (i.e. a draw), GameWinChecker returns false.
TEST_METHOD(ExpectNotWon_GameStateDraw)
{
    // Arrange
    char symbol = 'X';
    std::array<char, 9> gameState = {
        'X', 'O', 'X',
    'X', 'X', 'O',
    'O', 'X', 'O'
    };

    // Act
    GameWinChecker gameWinChecker;
    bool gameWon = gameWinChecker.checkIfSymbolHasWon(symbol, gameState);

    // Assert
    Assert::IsFalse(gameWon, L"More information here...");
}
Now it’s time to put my unit tests… to the test.
Running the Tests
The tests currently call a function that I’ve haven’t defined yet, so all tests should fail. Running them now will ensure any obvious logic fails will pop up before moving on to refactoring.
Using Visual Studio Test Explorer in the IDE
Since VS 2019 ships with the VS Test Platform, it’s super simple to run unit test projects from within the IDE, the VS Console or Terminal. If you’re a GUI fan, you can use Test Explorer:
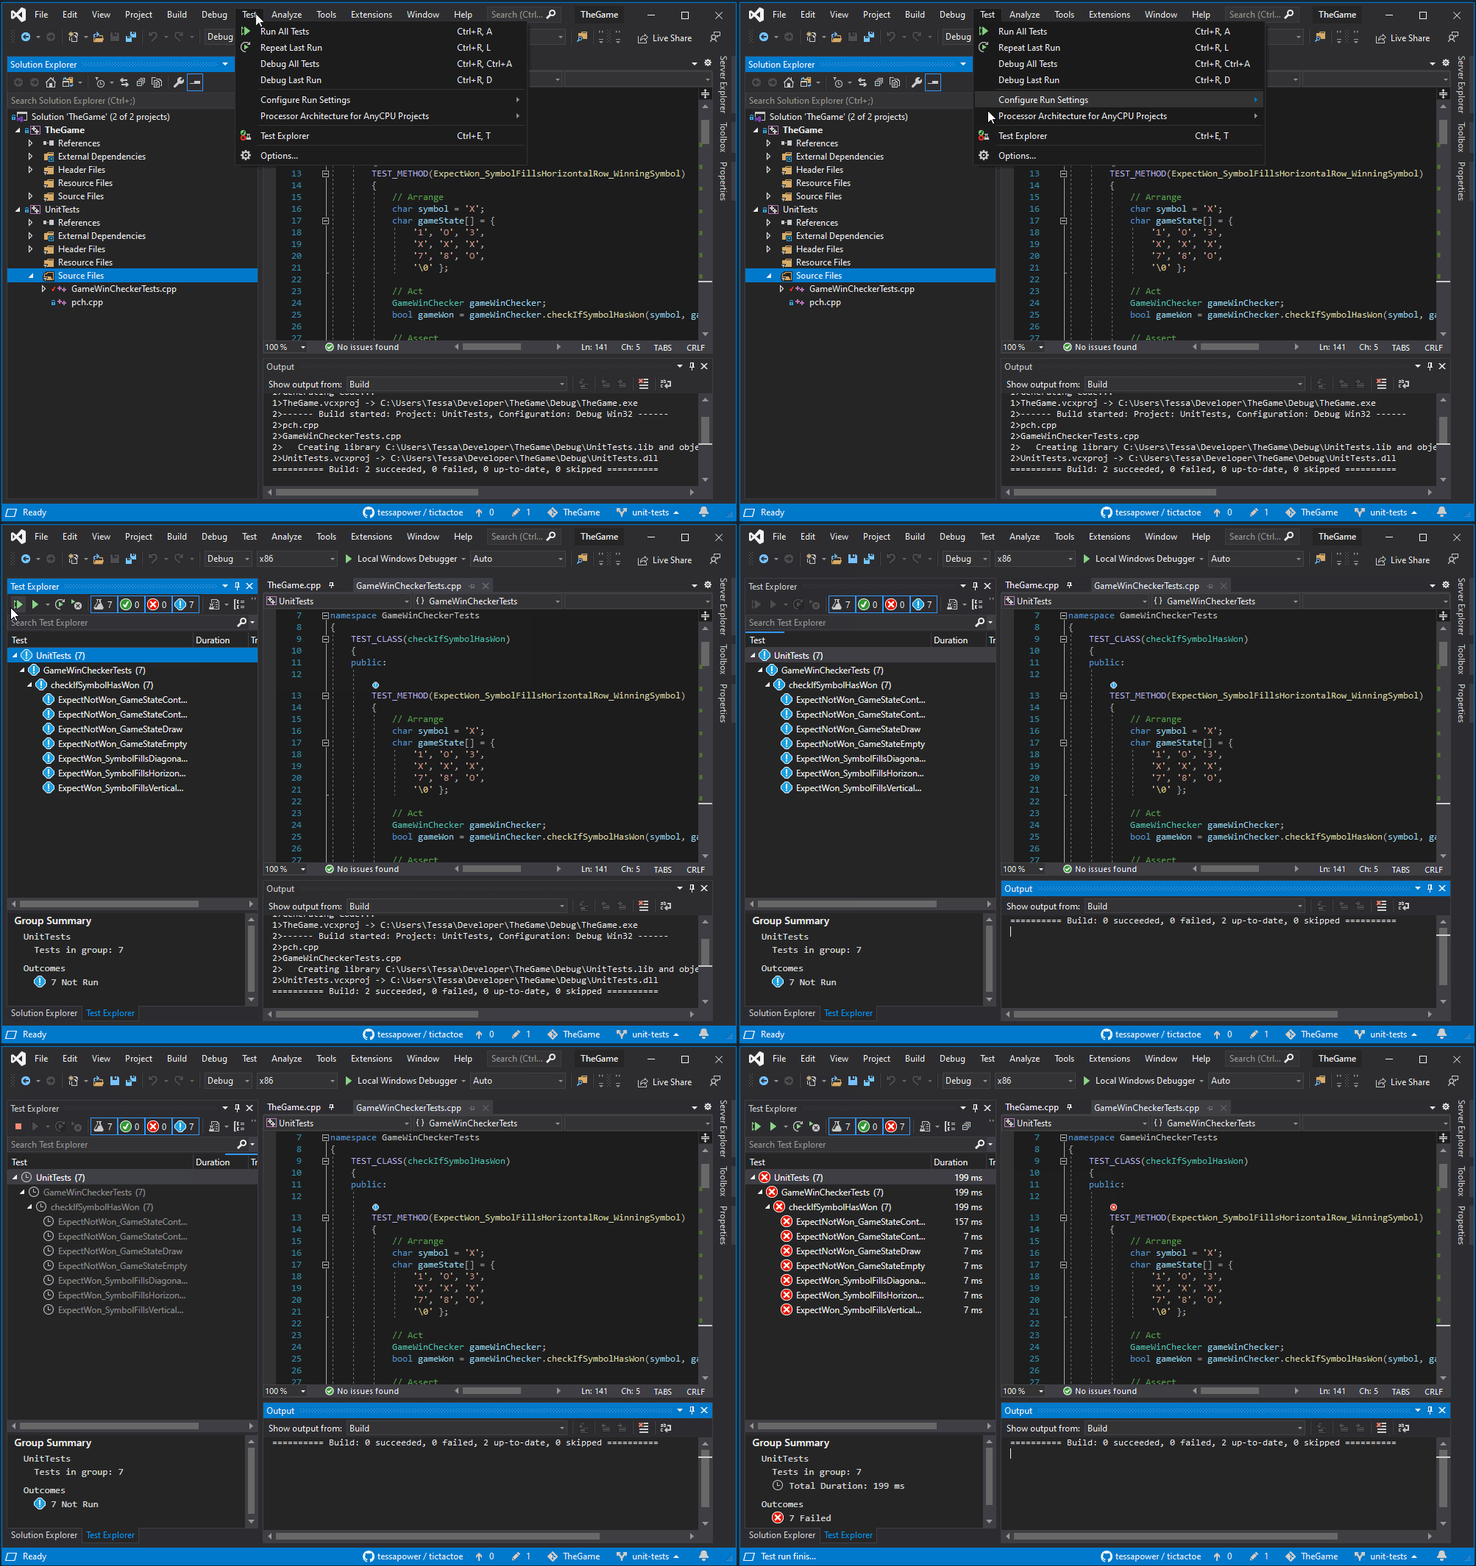
The GUI is a great way to quickly scan and see which tests have passed or failed.
Using Visual Studio Test Console in Windows Terminal
I’m a Terminal fan, so I opted to run VSTest.console.exe in Windows Terminal. Alternatively, you can use the built in VS Command Prompt, which you can find under Tools in the menu bar. The end result is exactly the same, except when using the VS Command Prompt, you’ll start off in a different directory than where you usually do in a fresh Terminal window. This is important, because you need to know where to find VSTest.console.exe to run it.
According to Microsoft’s VS docs, VSTest.console.exe is found in the following directory:
c:\%Program Files(x86)%\Microsoft Visual Studio\<version>\<edition>\common7\ide\CommonExtensions\<Platform | Microsoft(x86)%\Microsoft Visual Studio\<version>\<edition>\common7\ide\CommonExtensions\<Platform | Microsoft>
It’s a bit fiddly, but I eventually found it. To run the tests on my machine, it looked like this:
cd '\Program Files (x86)\Microsoft Visual Studio\2019\Community\Common7\IDE\CommonExtensions\Microsoft\TestWindow'
vstest.console.exe c:\path\to\unit\tests\
Which resulted in this:
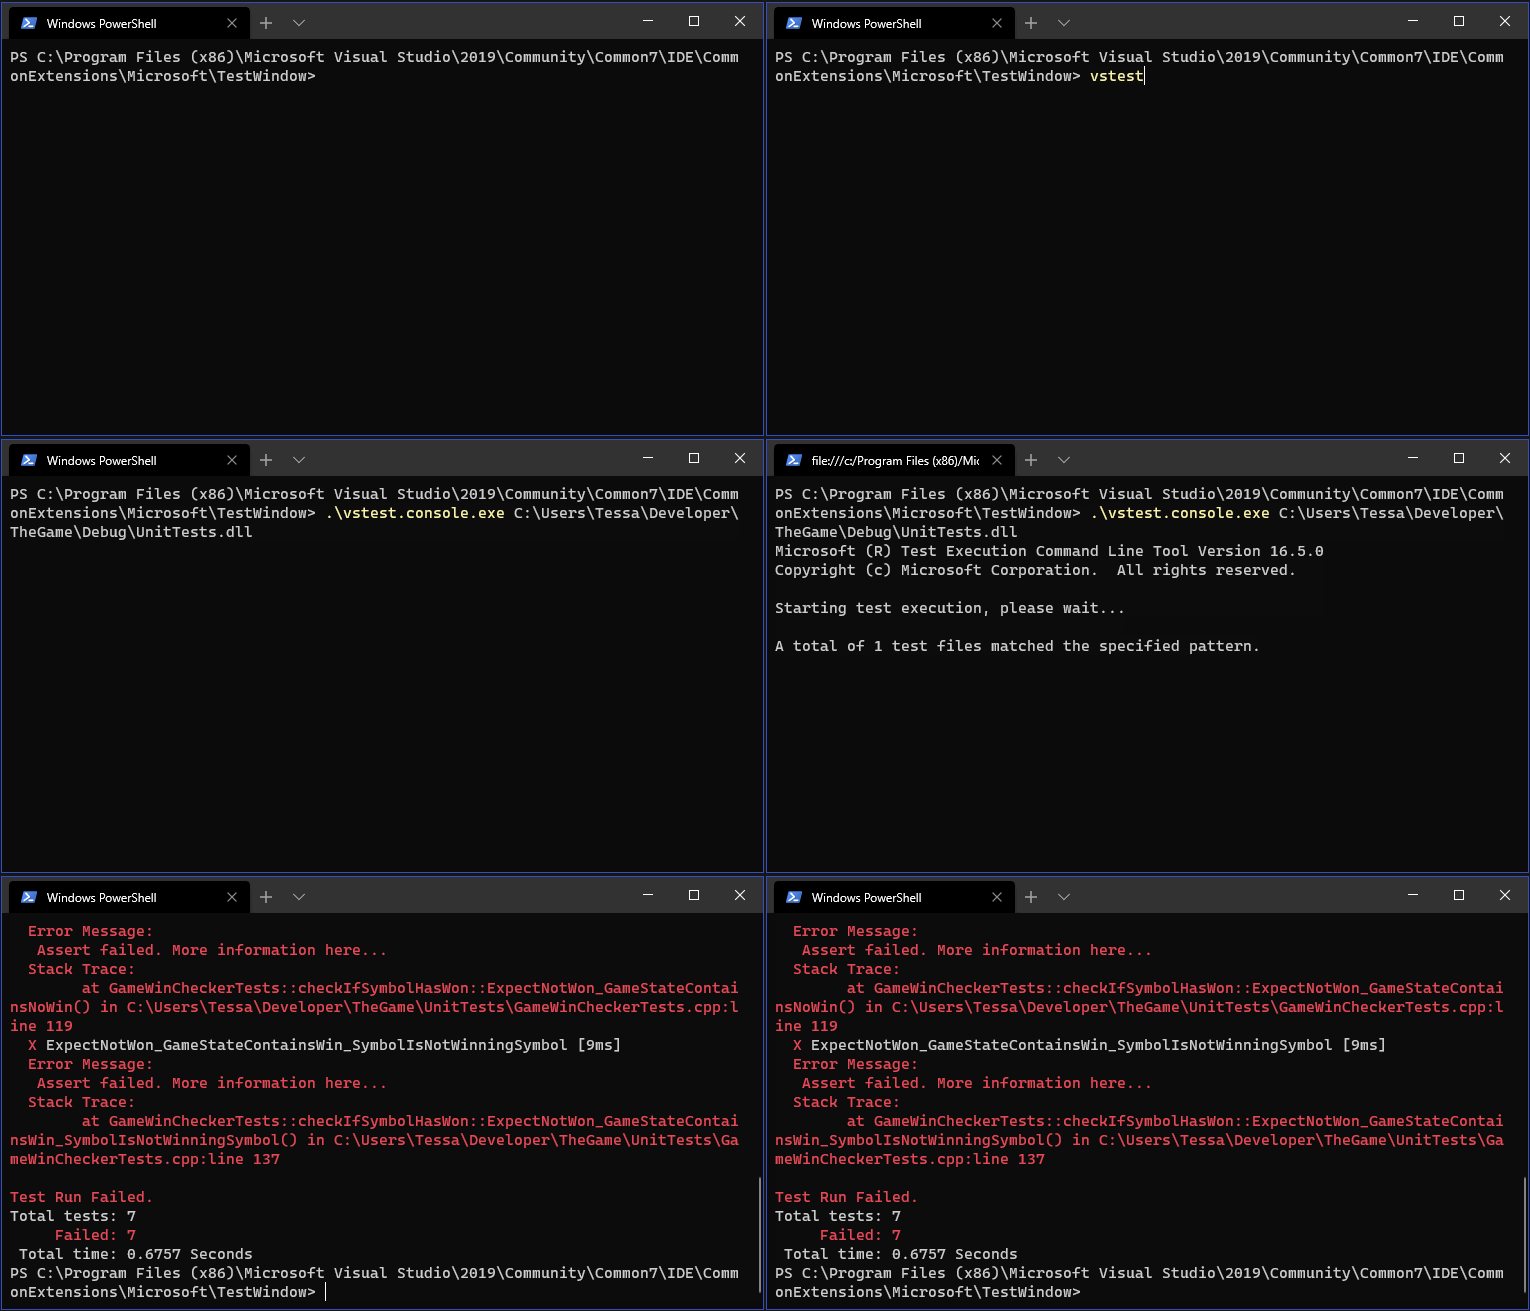
Now that the tests are doing a great job at failing, we can refactor TheGame.cpp to get them passing!
Stuff That Didn’t Go to Plan
Linker Errors :(
I missed a crucial step when setting up the Unit Tests Project that lead to linker errors when I first went to run the tests (LNK1165, LNK2005, and LNK2019). I was pretty frustrated, as the errors were blocking tests from running. After googling the possible causes for (what felt like) forever, I eventually found out the issue:
The code under test is built as an .exe file and not a .dll. Which means I needed to link the separate Unit Test Project to the output object file. The code being tested doesn’t export the functions that I wanted to test, so the fix was to add the output .obj or .lib file to the dependencies of the test project.
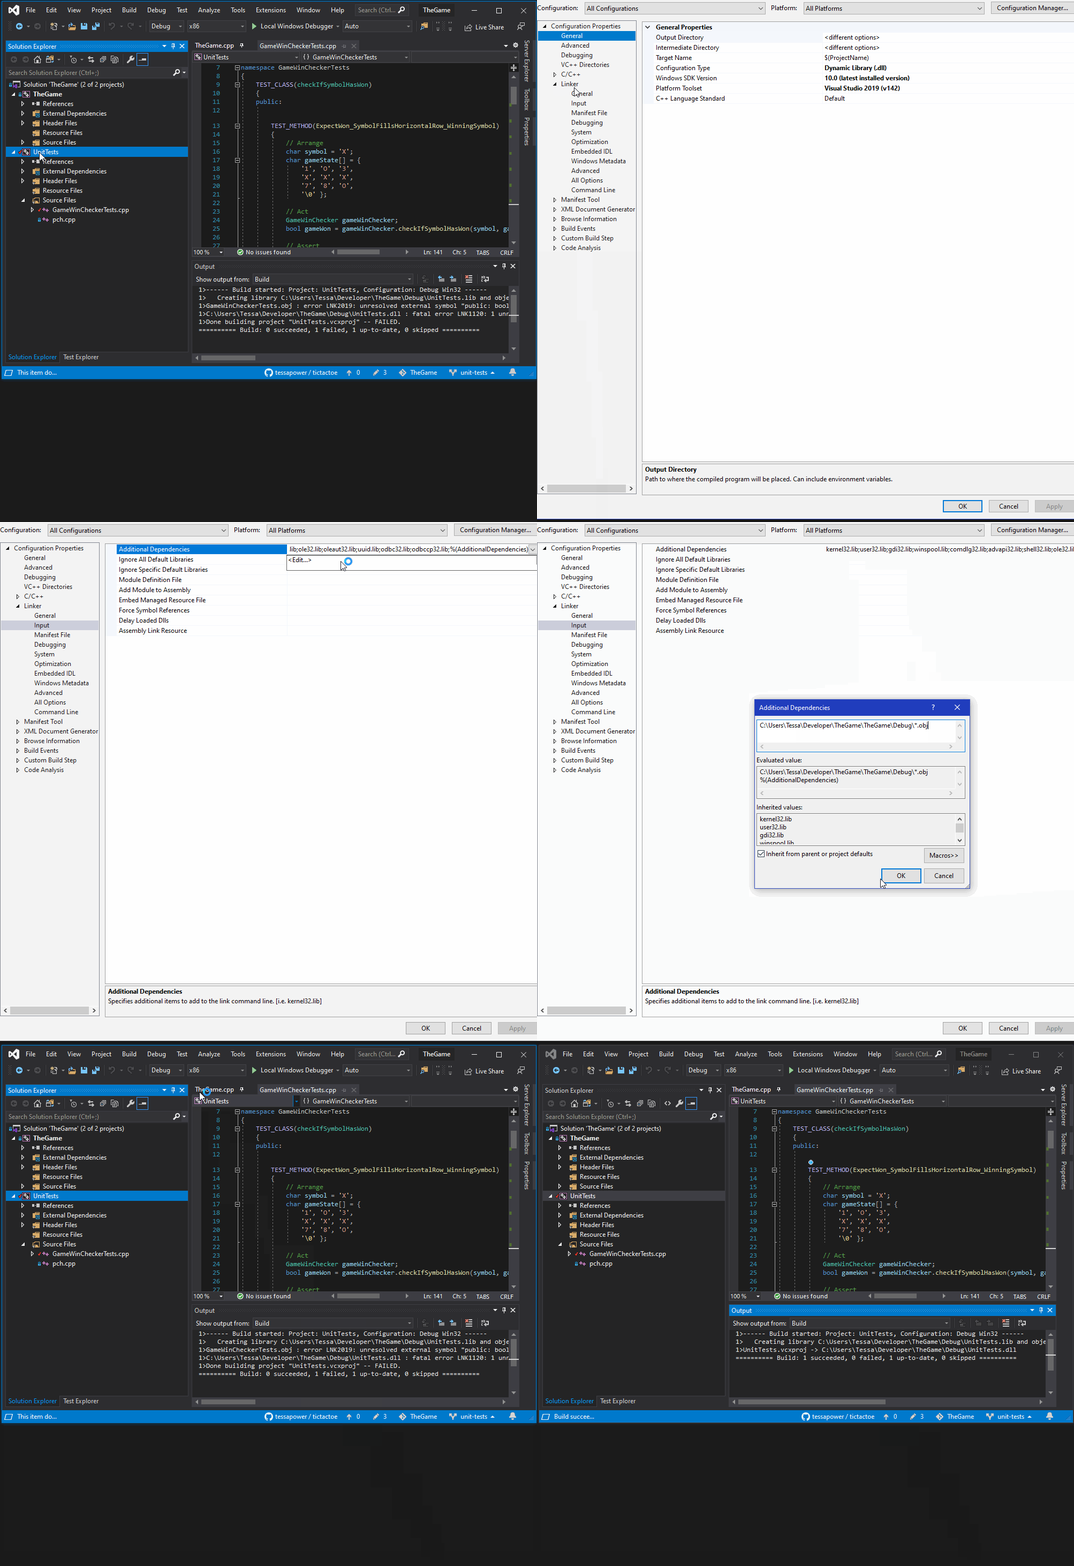
Here’s how I did that:
- Right-click the Unit Test Project.
- Click
Propertiesand in the new window clickLinker > Input > Additional Dependencies > Edit. - Add the path to the
.objfile-in my case I used"$(SolutionDir)TheGame\$(IntDir)*.obj", whereTheGameis the target project name.
What’s Next?
Using the VS Test Platform in Terminal works great! But if I have to do this every time, it’s going to get tedious. So my next job is to automate my unit testing using GitHub Actions before continuing with the refactor.